
Welcome! Click here to login or here to register.
| |
|||||||||||||||||||
|
|||||||||||||||||||
Drawing help contents
Introduction
General settings
Helices section
Proteins
How to get a finished picture?
Introduction
The REPAIRtoire drawing system was created to provide images for purpose of illustration of DNA repair pathways, but in the course of time it appeared that it can be used as a standalone tool.
You can use it for quick and efficient creation of nice looking pictures of DNA repair steps with just a few clicks of mouse! And all of your pictures will have the unified style, which will make an illustration of the whole pathway easy.
The SVG format used in by the drawing engine make the images easy to resize without lost of the quality and make it possible to modify them with external tools for vector graphics processing, like multiplatform and opensourced Inkscape or many others free and commercial products.
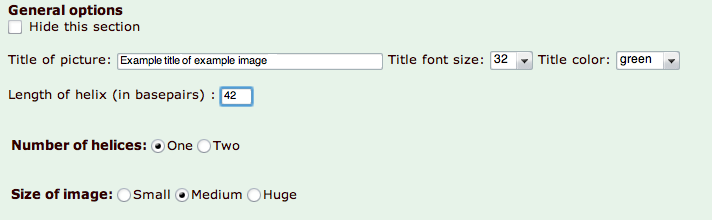
General settings
BasicYou can edit your picture filling the standard form - just mark or unmark checkboxes, select options with radio buttons or type values or names in textboxes.
Preview
To see results of your changes just click at any of "Preview" buttons on the page. Even if you didn't filled anything, this will display the picture with default parameters. You need to click at "Preview" every time you want to visualize changes. If you are not happy with your changes, just click "Back" (or similar) button on your browser.
Title of a picture
Optional title of image will be displayed in the upper-left corner of the picture. You can select from various predefined colors and sizes of font. Multiline titles are also allowed. To begin a new line just place a pipe character ("|").
Warning: At this moment you can use national alphabets characters in the picture, but any attempt of downloading such picture will cause an error. So please limit the characters in your title to ASCII alphabet. This problem should be fixed soon.
Length of helix
You can set the length of DNA helix in the range from 1 to 999. Length is expressed in the number of nucleotides in the strand (or in other words in base pairs). If you need to have two helices in your picture, this parameter will apply to both of them.
Note that some of the web browsers (for example Opera) allow to fit the contents of a web page to the width of a window, what may result inlack of visibility of the entire image. In case of any problems you can switch off these features.
Number of helices
You may have one or two helices in your picture. Two helices are useful for example in case of recombination.
You just need to remember, that if you reduce number of helices on your picture from two to one, all proteins assigned to bottom helix will disappear.
Size of image
You can select from three predefined size of image and can safely change them during your work. If you are not satisfied with any of the proposed sizes, you can easily change the size in any vector graphics editor without lost of quality.
Screenshot showing example settings and a resulting picture is shown below.
|
Helices section
In this section every abnormal states of DNA should be defined. The section has a form of table (or two tables when two helices are present) containing possible states of nucleotides and textboxes, where appropriate nucleotides should be indicated.
Specify separately nucleotides containing particular features by giving their number from left to right regardless of strand, i.e. nucleotide 7 on 5'-3' strand is directly above nucleotide 7 on 3'-5' strand.
There are two ways of depicting nucleotides. You can type their numbers one by one or give a range, for example 17-22. The order of number in the range is not important. 17-22 means exactly the same as 22-17. And you can mix both ways as well. The notatoin "7,8,11,17-22" is legal. Note that you cannot enter a number greater than current length of the helix!
Some kinds of damages or states of nucleotides cannot be displayed in the same time. For example if you mark a nucleotide as damaged and give this number in 'Gaps' row, the nucleotide will not appear in the picture even though it should be in red (the default color of damage here). You need also to remember, that some effects can be described in more than one way. For example if you mark a nucleotide as 'Damaged base' and 'Damaged backbone' in the same time, the result will be exactly the same as when 'Damaged entire nucleotide' would be used.
What is more you can indicate names of the nucleotides (as A,T and so on) or modifications and 5', 3' ends in the picture. In one field of form insert the number of nucleotide that should be labeled, and in the field below it insert label of the nucleotide. Do the same for modifications and ends. Remember that you should enter labels in the same order as numbers - e.g. if you want to label nucleotide number 10 as T you should insert in one field 10 and in the other T, but if you want to label few nucleotides - e.g. 10 as T, 17 as G and 20 as C you should insert into number field numbers: 10,17, 20 and in the same order in label field labels: T, G, C.
Damaged entire nucleotides, Damaged bases, Damaged backbone
Nucleotides or their parts specified here will be marked with red color.
Apurynic/apyrimidinic sites
Here the nucleotides without bases are specified. Such nucleotides are intermediate product of some of repair pathways, are damages also and are not nucleotides actually.
Gaps
Nucleotides specified here won't be visible.
Breaks before, breaks after
Here the breaks before or after nucleotide are specified. These are the backbone breaks. So a fragment of a backbone before or after specified nucleotide won't be visible.
Shifted up, shifted down
This sections represents nucleotides, which are not involved in base pairing (at least in the same strand). Values entered here should be in range from 3 to (length_of_helix - 3). In other way an error will appear.
Junction up, junction down
Overhang at 5', overhang at 3'
Proteins
How to get a finished picture?
PNG formatAs for now there is PNG format of the picture available. Just click download as PNG file to get your picture. In the near future more formats will be available.
|
|

|

|